RiverSide delights

Have you ever been to RiverSide Walk in Kingston-upon-Thames? If not, you really should do, especially if you like good food and stunning views.

IMG_5634
How’s that for a view?

I was invited to “Taste the World” with RiverSide a few weeks ago, and I still find myself thinking about the tasty treats on offer there! A word of warning – not all of the food there is strictly healthy, but the quality is well worth the justification of a “cheat” meal.

The first restaurant we visited was Cau, and it was also my favourite of the night. Their contemporary Argentinian cuisine features so many delicious cuts of mouthwatering meat. Their steak and chorizo in particular was mind-blowing, and their chicken was so tender! I’m dribbling a little just thinking about it.

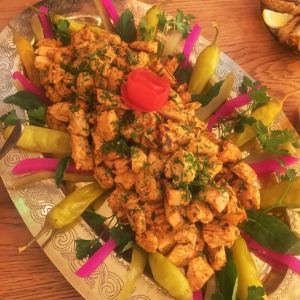
The next restaurant on the menu was Comptoir Libanais. I’ve been to different branches before, but this one is lovely and, as with all of them, adorably decorated with bright coloured prints and authentic Middle Eastern design. Not only is Lebanese food delicious and so full of flavour, it can also be very healthy if you opt for aubergine-rich baba ghanuj, houmous and grilled meat, such as chicken and lamb. As a non-drinker, I was also delighted by their vast array of fresh and fruit juice option – the Roomana (pomegranate and orange blossom) was a definite favourite.

IMG_5644

IMG_5646

Last, and certainly not least, we visited Côte Brasserie. At this point, we were absolutely stuffed, but there’s always room for pudding, right? Especially with their Dark Chocolate Mousse and signature Crème Caramel on offer! If you like French food or are keen to try some, Côte is an ideal choice.

Even though I was invited along and treated like a Queen (HUGE thanks to Ushma and the gang), I promise I’m being 100% honest when I say that Riverside is a beautiful place to visit and all of the restaurants there are fantastic! There’s something for everyone, and I can’t think of a better place to visit in the summer sunshine for a delicious meal and stunning scenery. You’ll feel more like you’re abroad on holiday than in a London borough! Get down there.

Perfect poached eggs

poached eggs

Who doesn’t love an egg? Apart from vegans, obviously (sorry vegans). They don’t just taste good – they contain plenty of powerful protein, which will give you lots of energy and help your body to heal itself. Isn’t that egg-citing?

I’m not good at many things, but one thing I’ve become something of a master at is poaching the hell out of eggs. I’ve seen all of the tutorials on Pinterest and I’ve tried various techniques, but this way has proven to be the easiest and most successful. Together with the right timing, you should be left with perfect eggs with a wonderfully runny yoke. Life will never be better.

Perfect poached eggs

Ingredients

2 eggs (per person)
A pinch of sea salt
A generous glug of white wine vinegar

Method

Take a medium-sized sauce pan and fill it 3/4 full with water. Put it on the hob on a medium heat, and add the salt and white wine vinegar. Wait until the water just starts to bubble – you don’t want it too hot. Break your first egg into a teacup and place it into the water (the egg, not the teacup). The egg will stay together well if you don’t move it around too much, hence the placing. Repeat for the second egg.

When all of your eggs are in, mark your timer for 4 mins – this is the perfect amount of time for making sure the egg is cooked well while still keeping the yoke nice and runny. When the time is up, fish the eggs out with a spoon that has some holes in it (ideally) and drain as much water off as possible. Serve however you bloody well like, and enjoy!

Homemade maple granola with nuts and seeds

12983990_10153781389112885_8056430187341751279_o

Late to the party as always, I recently got my hands on the Thug Kitchen cookbook. Have you heard of those guys? They’re awesome. I’m not a vegan by any stretch of the imagination, but the book is full of insanely delicious recipes – definitely worth a purchase.

This recipe caught my eye straight away and, even though it makes a big batch, I’ve already made it twice in two weeks. The kinds you can get from the supermarket often contain so much sugar and other nasty stuff, so making your own is a great way to keep a good eye on what you’re eating. It’s super easy, and the best part is you can add pretty much anything you like to it! I’ve adapted their recipe to suit my diet better (swapped out olive oil for coconut oil, dried cranberries for raisins etc.), so here’s my take on their brilliant breakfast staple.

Homemade maple granola with nuts and seeds

Ingredients

3 cups of whole rolled oats
1/2 cup of sunflower seeds
1/2 chopped almonds
1/3 flaxseed
1/3 chia seeds
1/2 maple syrup
1/3 cup of coconut oil
1/2 teaspoon of vanilla powder (I prefer the fancy Madagascan kind)
1/2 teaspoon of ground cinnamon
A pinch of sea salt
1/2 raisins

Method

First things first, heat your oven to around 150 degrees Celsius (300 Fahrenheit) and line a big rimmed baking sheet with some parchment paper.

Pour the oats, various seeds and almonds into a big bowl and mix them all together. In a microwave-safe mug, melt the coconut oil (30 seconds should do it) and then mix in the maple syrup and vanilla powder. Pour the syrup-y oil all over the oat mix and give it a really good stir. You want to make sure all of the oats are good and covered.

Spread the oat mix all over the baking sheet, and stick it in the oven for about 40 minutes. Take it out every 10 minutes and give it a stir to make sure all of the oats get good and toasted.

When the time is up, take the tray out and stir in the raisins. Leave it to cool, and then pour it all into an air-tight container. It should last for up to two weeks, but I challenge you not to finish it in a few days. My favourite way to eat it is with Greek yoghurt, fresh berries and a dash of honey because IT’S SO GOOD. Enjoy!

Porridge with hazelnut milk, raspberries, banana and coconut honey

edited1

edited2

Porridge (or oatmeal, as our American friends like to call it) is a bit of a classic, isn’t it? So simple, yet so filling and satisfying. It’s taken me a very long time to realise that you don’t need to add a ton of sugar to make it taste good either! Turns out raspberries work amazingly well, as they basically turn to a pureé as you mix them in with the lovely warm oats, and the banana gives it a wonderful richness.

Regular honey or maple syrup make for perfect sweeteners but I was given this beautiful Coconut Honey from Ceylon Coconut Company, so I had to try it out. Have you tried Coconut Honey? It’s really quite something, and made from the sap of coconut blossoms. I’d say it’s more like a dark syrup than a honey really. I’ve tried to find this exact product online, but the closest I can get is this Coconut Syrup from Coconut Merchant (their stuff is amazing, so I have no doubts that it’ll be delicious).

IMG_5430 (1)

Porridge with hazelnut milk, raspberries, banana and coconut honey

Ingredients

1 cup of rolled oats (not the ground-up instant kind)
2 cups of hazelnut milk (pretty much any milk will work)
1 cup of fresh raspberries (keep a couple aside to go on top so that it looks pretty)
1 large/medium or 2 small banana(s)
2 tbsp coconut honey (or your sweetener of choice)

Method

Add your oats and milk to a saucepan, and warm up on a medium heat. Stir it occasionally. Meanwhile, chop up your banana into little chunks. You could always blend it or mash it up if you prefer a finer consistency.

As the oats start to absorb the milk, keep a close eye to make sure it stays nice and moist (sorry, I know people hate that word). When it’s reaches your desired texture, take the pan off the heat and stir in the banana. Once it’s well combined, add your raspberries and stir vigorously. Your aim here is to break them up so that the porridge is good and flavoured. Once it’s all mixed together and looking lovely, pour it into a bowl and add your coconut honey on top (you may want to add a little extra – just listen to your heart), followed by the remaining raspberries. Eat up while it’s hot and enjoy!

Chocolate Banana Pancakes

pancakes2

Close up.JPG

Happy almost Easter! Or, as I like to call it, Eat-ster. It’s hard to be healthy on holidays that are so centred around food, especially this one. Who doesn’t love a good chocolate egg? There are healthier ways to enjoy them (dark chocolate and the like), but it helps to at least start the day right with a nutritious and breakfast. That being said, this doesn’t mean it can’t be decadent!

I make these pancakes all the time, but I never thought to make them chocolatey until now. The rule is one banana and two eggs per person, which will make a stack of three or four depending on how big you like them. They’re so quick and simple to make (only three ingredients), are gluten-free and full of protein. If you don’t like chocolate, they’re just as delicious with vanilla. As you can see, I had these with the cherries left over from my Cherry and Cacao Chia Pudding recipe, but you can top them with whatever you like. I do highly recommend fresh berries and maple syrup or honey though. They almost taste too good to be healthy.

Chocolate Banana Pancakes

Ingredients

1 banana
2 eggs
1 tbsp cacao powder
1 tbsp coconut oil (with a little extra on standby, just in case)

Method

In a blender, mix together the banana, eggs and cacao powder. You can do this by hand if you prefer, but I’ve found the pancakes taste better when the batter is good and smooth.

Heat a frying pan on a medium heat and melt the coconut oil. Spread it all around the pan so it’s well-coated, and ladle in a big spoonful of the batter. As there is no flour to bind these, the pancakes will be more delicate than the normal kind, so many sure they’re fully cooked on the bottom before you flip them – this should take roughly two minutes. Repeat this process until you use all of the batter and have a sexy little stack (I’m bringing sexy stack). You might need to add more coconut oil between pancakes. Add your toppings of choice, and eat them all up. Enjoy!

Cherry and Cacao Chia Pudding

wide shot

close up

It feels like a bit of a cop out to post a chia pudding for my first recipe as they’re so easy to make but after having it for breakfast this morning, I knew I had to share it. With chia pudding, not only do you get all of the brilliant benefits of Omega 3, protein, iron and antioxidants, but you also get the smug sense of satisfaction that comes with preparing meals in advance. I had it for breakfast, but it could really be enjoyed any time.

There’s something very decadent about cherries, isn’t there? It could be because they’re slightly pricier than other fruit (although I got a great deal on mine from my local grocer), but I think it’s mainly because their flavour is so subtle and rich.They go so bloody well with cacao too. The fact that they’re also chock-full of health benefits is just an added bonus.

Cherry and Cacao Chia Pudding with Cacao Nibs and Coconut

Ingredients 

1 cup of fresh cherries (1/2 for blending, 1/2 for chopping. Obviously remove the stones.)
1/2 cup of chia seeds
1 cup of hazelnut milk (it’s amazing with the cacao, but any dairy-alternative would work)
1 tbsp of cacao powder
1 tsp of raw cacao nibs
1 tsp of desiccated coconut

Method

In a blender, mix together half of the cherries, the hazelnut milk and the cacao powder until nice and smooth. In a jar/some sort of appropriate vessel with a lid, add the chia seeds and pour the chocolatey cherry milk on top. Close the lid, and shake it like a polaroid picture. Pop it in the fridge and leave it for at least 3 hours. Overnight works too.

When you’re ready to eat the damn thing, open the jar (it should smell amazing in there) and decant the contents into a bowl (because so it’s easier to eat. You can keep it in the jar to save on washing up if you like). Fold in the lovely chopped cherries, and sprinkle the cacao nibs and coconut on top for texture and prettiness. Eat and enjoy!